
On Wednesday the 26th, I went to the cinema to see Mockingjay Part One. Throughout the first and second movie, Katniss Everdeen wore some gorgeous braided hairstyles. I was inspired to create this braided hairstyle on my little sister Róisín. I hope that you can learn how to do this braid from this blog post. I tried to make both the pictures and instructions as easy to understand as possible! It's definitely difficult to teach a hairstyle through pics!
Let's get into the tutorial!!

Dutch braids have the same method as French Braids. For a French Braid, you braid over the middle section. For a Dutch Braid, you braid under the middle section. You continue this method for the whole braid.
Step One : Brush hair to remove any knots or tangles.
This step is pretty straight forward. Brushing your hair allows you to braid the hair a lot easier. For this step, I used a Tangle Teezer Inspired Brush that I picked up in Wispys, Ballina for a TINY €2!! I found these in Heatons, Ballina also. These are excellent brushes! They work wonders! I would definitely give these a try before you splurge around €15 on a Tangle Teezer.

Step Two : Seperate your Fringe from the rest of your hair.
Katniss usually wore her fringe down and didn't braid it. Leaving your fringe out of the braid, frames your face. It gives the braid a casual and effortless look. If it's easier for you, use a hair tie or clip to hold the fringe away from the rest of your hair.

Step Three : Take a section of hair and seperate into three pieces.
Now you are going to take a piece of hair and divide into three pieces. Where you choose to take the section of hair will help the direction you will braid. If you want a vertical dutch braid, take the piece of hair at the very middle of your head. If you wish to create a diaganol dutch braid, take a section of hair from the side of your face. I took hair from the right side of Róisín's head. Katniss usually wore a braid that begun on the same side of your fringe and finished on her opposite side.

Step Four : Begin the Braid.

This is when the instructions can get tricky and confusing. I promise I will try and explain it as easy as possible. The easiest way to explain it is to give each strand a letter; A, B & C. The strand on the left will be called A. The strand in the middle will always be called B. The strand on the right will be called C. A & C are always the two outer strands. B is always the middle strand.
I usually start with the right strand C. To begin the braid, take C. and bring it into the centre by pulling it underneath B. It can be seen in Step 2 & 3 in the photo. Now, C. has been changed to B. and B. has been changed to C. because they have swapped places. To ensure you get a Dutch Braid, make sure you ALWAYS tuck the piece UNDERNEATH the middle strand.
Now you are going to repeat that step with the A strand. Bring the A strand to the middle by tucking it below the middle strand B. It can be seen in Step 4.
Step Five : Begin adding Hair.

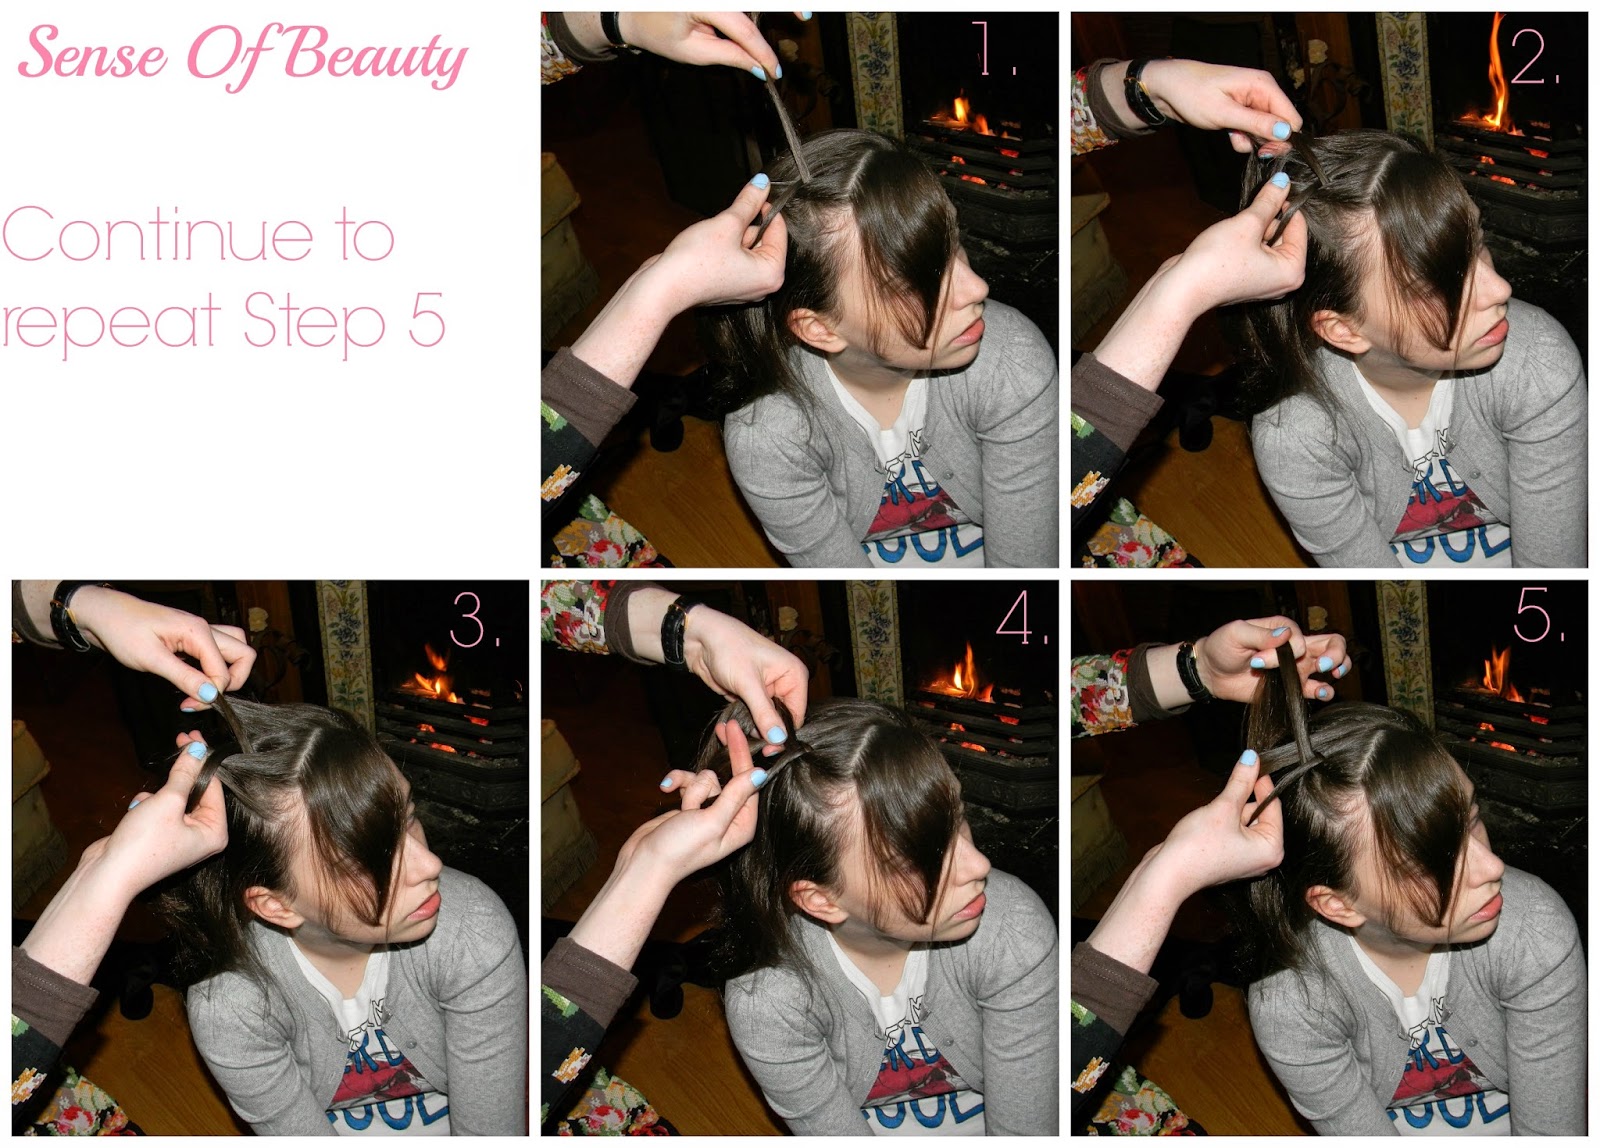
Step Five is when it all begins to get even more difficult! For Step 5, you begin to add hair to your braid. In Step Four, we brought A & C into the middle by pulling it underneath the B strand. You will want to continue this method of having 3 strands; A, B & C. Before pulling C underneath B to the centre, you are going to add a small section of hair that is beside C to section C. Once this is added you will then pull this under B into the middle.
Next, you are going to add a piece of hair to your A strand. Then, pull strand A under B to become the new middle.
Basically, these pics are using the same method as Step Four : Begin the braid. I recommend that one of the easiest ways to understand how to do a dutch braid is to use the A, B & C process.
Begin with A (left strand), B (middle strand) and C (right strand).
Add piece of hair to C (right strand). Pull C strand (right strand) underneath B (middle strand). Now C strand is in the middle and the B strand is on the right where C used to be.
Add a piece of hair to A (left strand). Pull A strand (left strand) underneath B (middle strand - was C but now will be called B because it is in the middle). Now A strand is in the middle and B strand (old C) is on the left where A used to be.
Always call the left strand A. The middle strand B. The left strand C.

In this pic, I am still continuing on with Step 5. I am staying with my A, B & C system. Adding pieces of hair to the A & C strands and crossing them underneath the B strand.

In Step 4 , you can see the Dutch Braid close up.


The larger the sections you add to the A & C strands, the braid will look more casual, messy and will take less time to complete. The smaller the sections you add to the A & C strands, the braid will appear structured and will take more time.

When you cannot add any more hair to your A & C sections, you are going to continue the process just like you did in Step Four : Begin The Braid. You will still cross C and A under B into the middle.
When you wish to finish the braid, take a rubber elastic and tie at the end of the braid.
That's your braid finished!

I hope this blog post was helpful!
I promise I tried my hardest to explain the method as best as possible!
Here's a video montage of all pics taken when I was doing this braid!
This might help you!
I hope you enjoyed this blog post!
Next blog post will be posted Monday!
Thanks again!
Love,
Siobhán xo
No comments:
Post a Comment